

Runequest Thursday #206 - A Collapsed Ruin in the Rubble!

Because the Brightwater Company has been traipsing around the Big Rubble of late, I wrote up this little dungeon crawl for Runequest. You could put it just about anywhere. It uses a number of special spells and a sorcery system of my on devising - all included here.
If you hope to play through this, you should probably stop reading about now.
Gamemaster's Only:
The ruin is situated in the Big Rubble, at or near the teardrop mark at the end of the red line on the inset map. Of course, you can put it anywhere you like, in or beyond the Rubble.

Detail: From the Map of the Big Rubble (c) Chaosium.
On approach:
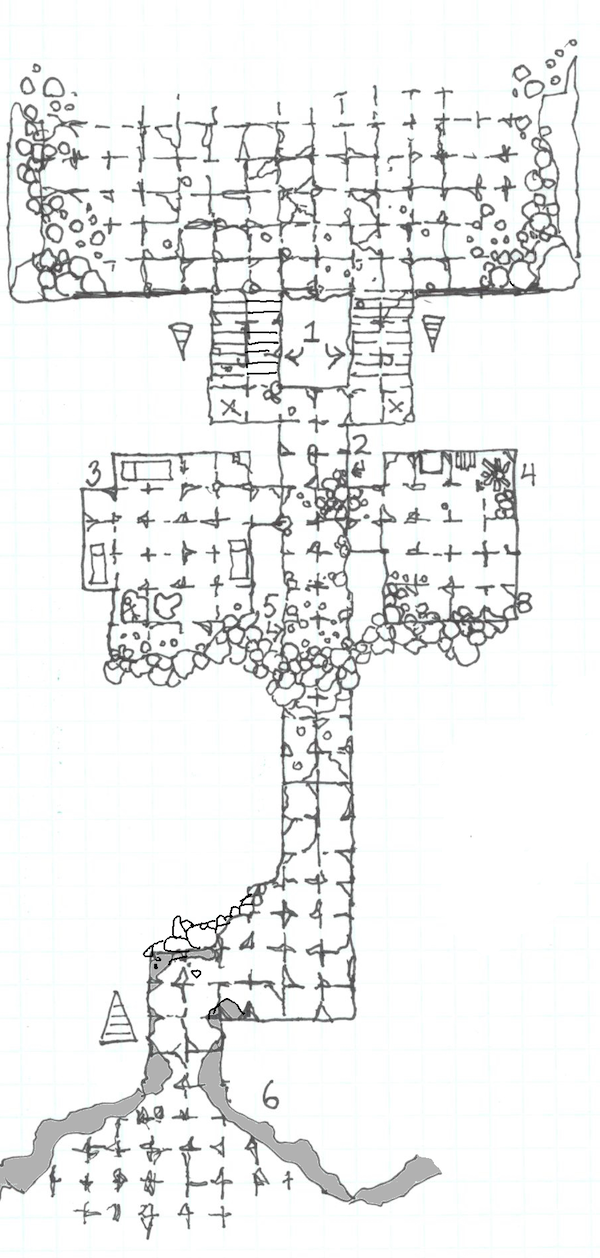
An open area within the Rubble reveals the remains of a paved courtyard, covered with patches of sand, grass and scattered with debris. In places, faded mosaics suggest a massive checkerboard of pink and grey. Once it was grand. The black mouths of a pair of now ragged-looking entryways into the featureless rockface at the southern end of the courtyard beckon.
Map Key:
1 - From the courtyard descend two parallel staircases. The westward one is trapped and inhabited by a zombie, stuck into the wall with sorcerous earthwork (marked “X”). The Zombie will lurch forward slightly, but cannot pursue. The trap will spring when the target reacts to the Zombie by pushing against the other wall. A rock falls, doing 1d10 damage rolling 1d10+10 for location, Unless the target can Evade. Then the zombie can attack with advantage. Of course, if you are a necromancer, you can simply command the zombie and pass without difficulty.
The eastern passage has an identical trap, and zombie, with the addition of a broken jug, the oil of which has been poured over the area and the zombie. There is no fire source here, so the zombie and area will only burn if set on fire, but anyone who attacked by the zombie or the trap is covered in oil (which may become significant later).
2 – This low-ceilinged hallway has a floor of broken pavers and scattered rubble. It reeks of smoke, cooked meat and foulness. Its furthest end is shadowed, but proves to have collapsed and must once have reached deeper. There are two doorways to either side of the corridor, the eastern doorway shows a flickering light from within.
3 – The Study. A group of necromancers make this squalid ruin their home, though this is not immediately apparent to those who enter. The room is in disarray. Unmade bedding for three lies along the exterior walls. A large flat-topped section of rockfall has been converted to a makeshift table, upon which is the body of a partially flayed baboon. Crouching behind the table is one of the necromancers – Selonius – now a wight after the “success” of a recent experiment. He is hiding, and will attack with Advantage (+20% to hit) unless his target makes a successful Spot Hidden. Nearby, the ground is slick with oil from a broken lamp, a hazard requiring a DEX x3% to avoid if engaged with the Wight.
Another wight (Cassandra), who “created” the necromancer wight, is propped in the southeast corner, her head down, hair falling over the face and looking much like the other corpses. Fresh blood is apparent on the front of her scaleshirt. If her protégé is doing well on the attack, she will join in. If not, she will wait for a victim to approach, or for the opportunity to escape.
TACTICAL NOTES: If a fight occurs in 2 or 3, the inhabitants of the other room will investigate or flee as appropriate to the situation as they see it. If the adventurers are doing well, flight is much more likely. If one or more adventurers are down or dead, the necromancers will attempt to hasten death and raise them as servants, sending them to the attack immediately. The warrior wight will prefer living but vulnerable targets to slay – who will then rise as wights under her control. If the light from the Kitchen draws investigation first, the necromancer wight will leave his hiding place and attack from behind as the adventurers move into the other room. He is not above fleeing to the Study (and help) if he is met with powerful resistance.
Should she attack, she will use the stored POW to cast fireblade upon her battleaxe while clawing with her free hand. Anyone doused in oil by a tussel with the zombie in the eastern descent, will be set on fire if struck by the fireblade unless they can roll (POW x3%). If set aflame, the target location suffers 1d4 additional damage (Armor works until overcome) per round until extinguished. If the unfortunate failed the roll by 20% or more, the flames expand to a second location (roll randomly). If the unfortunate Fumbled, 2 locations are affected. Certain spells, or dropping to the ground and rolling, etc, can extinguish the flames with a POWX3% success for each afflicted location.
The body of the necromancer wight, should he be destroyed and searched, yeilds: 1 mail vest, 2 a longsword, a hand axe, 3 daggers, 13 Lunars, 30 c, and a grimoire (see: Selonius). The warrior wight, has a scale shirt, a battle axe, leather leg armor and a fine silver diadem in her disheveled hair. The diadem has a Power storage crystal with 5 POW.
The southern wall of the Study has collapsed, and rubble and sand have choked off what may have been other areas beyond. Bits of broken wall and masonry litter the squares just north of the collapse.
4 – The Kitchen – this area has a crude cook fire, smoke from which would escape through a crack in the ceiling. Such smoke might in fact draw adventurers to investigate in the first place. Nearby is a small pile of wood and kindling. There is low quality food in sacks and clay pots. There is a dirty, but good cleaver, which counts as a hand axe in melee. The body of a skinned and gutted young baboon hangs from a hook over the cookfire, haphazardly smoked at best. A necromancer, Rutigar, is checking its doneness unless disturbed.
The southern wall of the kitchen is largely collapsed, with tons of rubble and sand blocking the way beyond.
5 – The floor in this area is unstable and the necromancers know not to go here until they have dealth with the collapse. Trapped in a pile of jumbled tiles is a prized zombie scorpionid, still relatively fresh, though now with one leg caught in the fall of rock. It can do nothing unless someone approaches or falls (DEX x3% to avoid) if within 10 feet of the barrier, but will attack with its claws and tail if possible.
The passage beyond 4 is blocked by a barrier of fallen debris. If this were cleared, a job requiring a dozen or more man hours, or the use of a level 2 or better gnome for an hour or two) it would open into a passage somewhat silted with sand, that gets sandier as it approaches the southern bend and entryway.
6 – The Southern Ramp – A ramp to the surface at the far eastern end, is narrow end all but undetectable to anything but close inspection, hidden a slide of sand and debris from the surface 12 feet above. A baboon troupe (10 adults and 5 youngsters, led by a Foundchild hunter, and a Daka Fal Shaman) currently lives there. They are not hostile, but they do not allow others to wander through their home, and do not venture into the deeper portions, because the shaman senses bad spirits within. They can be bartered with, and with sufficient coaxing, might allow trustworthy folk through to the Southern Ramp.
The baboons are concerned about their troupe’s recent losses, for which they have not yet found the source. If the adventurers mention that they destroyed the necromancers and wights, this will go a long way to gaining the trust of the baboons.
Developments: This ruin, sufficiently cleansed (and perhaps better fortified), could function as a staging area or temporary home for Rubble explorers. If the Baboons can be made friendly, they may even become part of a locale neighborhood watch while the adventurers are away exploring. A number of rooms may well be buried in the rubble by the fracture point and could be dug out by said explorers, a task that would be made easier should one of them be a sorcerer who bothers to study the grimoire and learn the Conjure Dismiss Gnome 2 spell.
The third of the necromancers, and the most potent (Stravin) is away, and may return to trouble the adventurers should they linger. He may also have a number of zombies or other servile undead.