Runequest Thursday #179 - Full Adventure: Cavern of the Charnel Cult!

If you have been looking at D-Infinity.net over the past few weeks, you probably are aware that William T. Thrasher has been mapping out cunning caverns and dire dungeons, then posting them for your (and my) benefit! These maps are terrific, with a great old school feel, and a lot of imagination thrown into their creation. My only regret is that he is way faster at mapping them than I am at using them.
But I did use one. And I just finished meatgrinding a group of players in my Savage North Runequest game through it.
With that little giveaway, maybe you can guess which one I chose?
The Cavern of the Charnel Cult - Unnaturally!
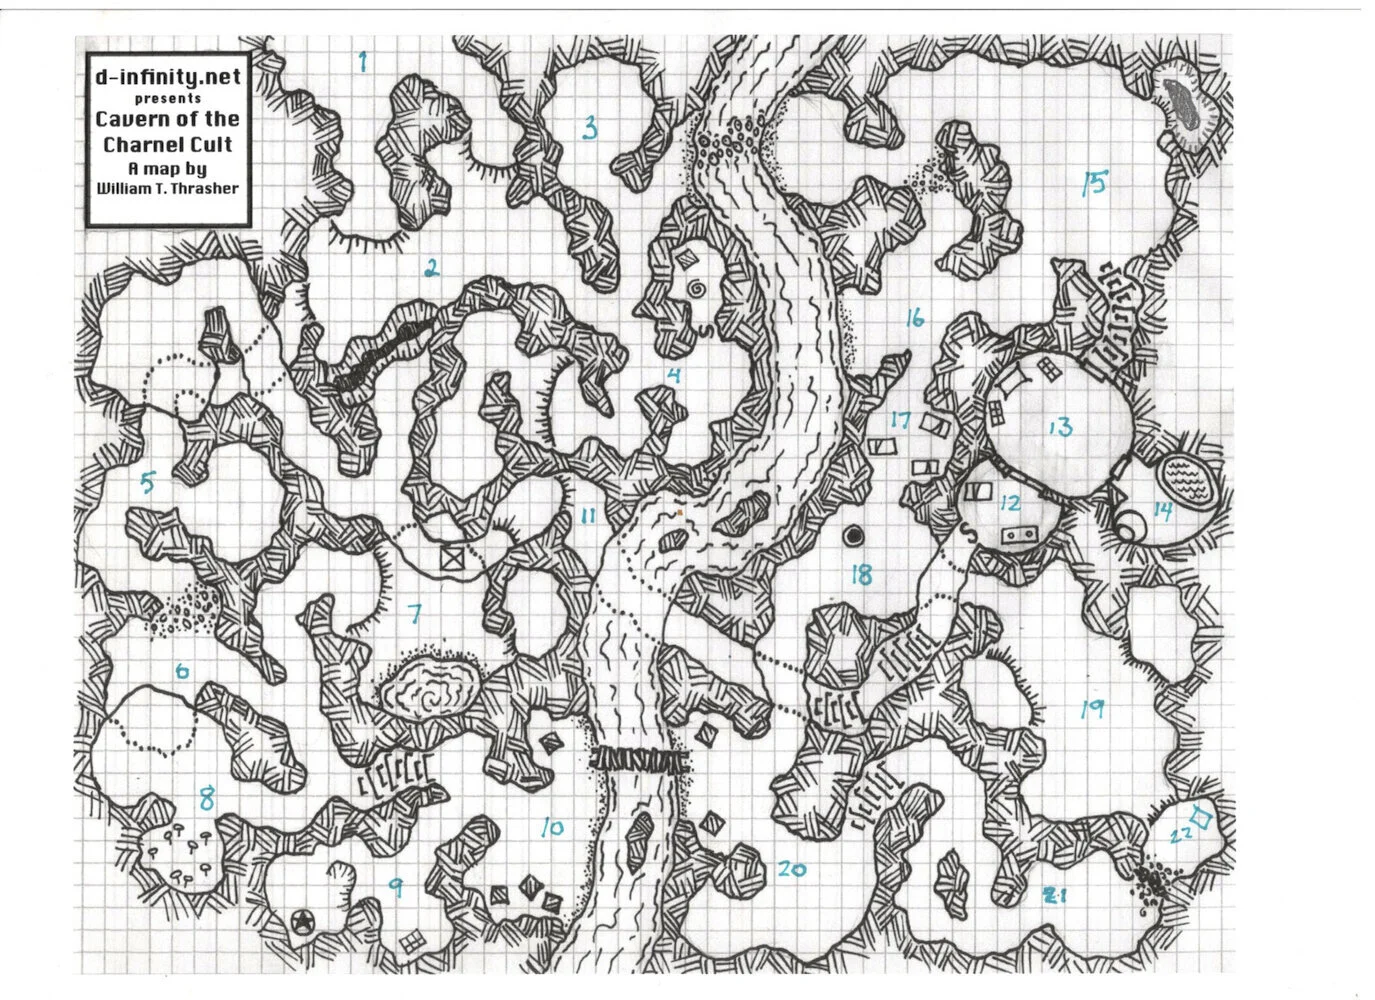
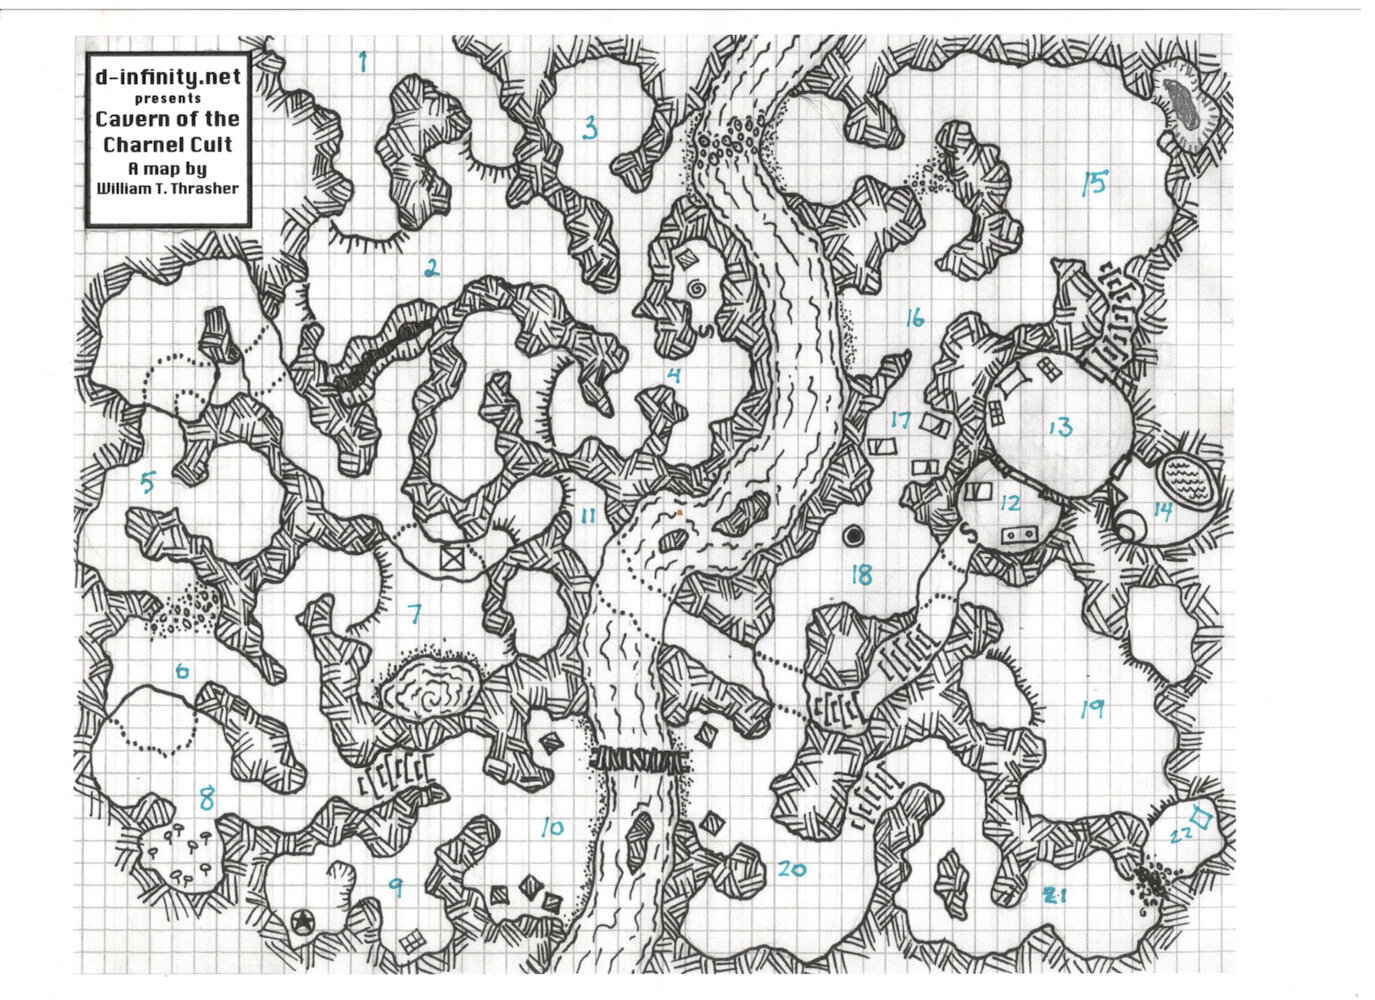
As soon as I saw that one, I knew I had the perfect situation in my Savage North game to showcase the horrific practices of the Carrion Cult of Crawral - Blood God of discerning cannibals everywhere. So I set about writing up the various locations in Will's Cavern. Which I will now disgorge to you. Below is the Legend I wrote for the map of Caverns of the Charnel Cult.
Note: If you want to download the files attached, which includes a doc of the Starving Mountain so that you don't have to cut and paste it from below, and play Cavern of the Charnel Cult, you may want to use my Sorcery and Witchcraft systems.
Starving Mountain
Starving Mountain, a place of ill omen for as long as the hardy mountain folk of Wodeland can remember, is shunned by the wise as well as the fearful. This is for good reason, because the Starving Mountain is home not only to a shrine to Crawral the Flesh-Eater and his faithful cult of cannibals, madmen and ghouls. It is also home to the Great Maw, a manifestation of the Blood God Crawral itself.
At the instigation of the High Eviscerator, the Charnel Cult has been steadily feasting from a potent witch, prisoner of the cult for years, and has harvested many secrets and spells from her flesh. She is maimed and near death, but preserved by the skill of the High Eviscerator, who regularly heals the worst of the wounds and keeps her from merciful death.
There is trouble brewing in the future of the Charnel Cult.
The potent lore and magic gained by the cult has given the High Eviscerator new ideas about how to serve Crawral, ideas that do not mesh with those of the Carrion King. A confrontation is inevitable. But the Carrion King has the absolute loyalty of the Hound, and of the hordes of Mad Flesh, while the High Eviscerator can ony count on her own power and that of a handful of Dessicata who have pledged themselves to her. Thus she has been seeking other avenues of power – like the captive witch. But she must share this with the Carrion King, lest he think she is ready to move against him. The Mushrooms and her Alchemy are also a measure in the tipping of the balance toward the High Eviscerator.
As things stand when the Cavern is breached by the Player Characters, the High Eviscerator still bides her time, gathering more power before she makes the Carrion King into actual Carrion.
Motivation for the PCs wanting to delve the Cavern:
1 - If your heroes are, well, heroes, they probably oppose cannibals and murderers on a general, visceral level. So wanting to remove them from the plane of existence they most favor is likely enough.
2 - It may be that enough locals have gone missing to attract the attention of the authorities, who post a reward for those who can find those missing or evidence of the destruction of the ones repsonsible.
3 - One of the missing is the powerful Warlock Ioran. One or more of the heroes might know of, or even be friends with, the poor warlock. If not him, then perhaps others known to one or more of the heroes are among those missing.
Map Legend:
The Rambles:
1 – Entryway: The cliff face up the side of the mountain leads here. Within is darkness and unworked cavern walls. To the left there is a short passage and cliff to a cavern, with a ragged-looking rope hanging over the edge to an area 25 feet below. To the right a longer passage with slopes downward to a shorter cliff overlooking a 10 foot jump. Both lead to 2.
2 – The Cleft: This cavern has a high cleft ceiling, like a giant knife-wound in the rock that continues up from the chasm leading downward. 1d6 Mad-flesh are here and they wander from 2 to 3 or even 5 and 6, ever hoping for food, and keeping the centipedes of 6 at bay or hunting them as need. At the south edge of the cavern, there is a deep trench splitting in the floor and reaching down into impenetrable mists. The choking mist rises sickly pink from below, and a rhythmic pulsing light seems to emanate from the depths. Beneath the mist, a successful SPOT check, discerns, half glimpsed fifty or more feet below, something massive that undulates lazily in time with the pulse of illumination.
3 – A Bestial Statue: A well camouflaged (SPOT to notice) cave troll (Gosdath) sits motionless as many another outcropping of rock. It has something in each clenched talon: Left : head of a feral eater; Right: A severed skeletal hand. On one of the fingers is a ring carved from a single piece of a smoky red stone. Gosdath is sleeping, but will awake unless those entering make successful Move Silently checks. Though somewhat hungry, it is not hostile and speaks on being approached, offering to trade what rather than fight. If the buyer will share a cup of hoom with him, they will get a better deal.
Gosdath’s “hoard”:
- A litter of very large shells (from centipedes that have wandered too near Gosdath).
- A rat’s skull talisman ready to accept a bound spirit.
- A dagger with a matrix for Cat’s Eye 1.
- The hand and the ring noted above.
They can also get him to talk about himself. And his people’s servitude to the Altanen vampires in the vales north of Starving Mountain. Gosdath and his clan escaped the vampires and fled into the mountains, finding this ill-aspected place just before the rising of the sun. They made lives here, avoiding the Great Maw, for some time, until the coming of the Charnel Cult, who drove some off, and killed others. Later the Serpentfolk arrived through their magic hole, and stole Gosdath’s surviving sisters. He has been waiting to die since, but thinks that maybe he is turning into a mountain instead. He likes this idea and will trade what he has so he doesn’t have to move and spoil the process.
The passage past Gosdath’s cave continues to the subterranean river ends at a series of stepping stones. They may be crossed with a successful Athletics Check, but failure means being swept north to the falls that exit the mountain 200 feet away. A kindly GM might allow a final grab for the edge of the falls (DEXx3%, or Athletics) before the plummet that does 4d6 to general Hit Points as the unfortunate bounces from the mountainside into a collecting pool 60 feet below.
4 – Older Caves: Cave paintings cover the walls of the cavern. The paintings depicts hunts, mythical scenes, and strange creatures not seen in the wild since primordial times. The secret door is unknown to the Cultists of Crawral, who are aware of the magic nearby, but have not found the door or hidden room. A rumbling sound may be heard from the east wall.
The hidden room has a trapped Air Elemental (3d6), it is bound to the Rune in the floor, and was intended to serve the elementalist (whose bones lie in a corner) by carrying him down the pit (the square). The pit leads to a gold fissure. 1d3 hours will free 1d100 gp worth of gold ore (weighing 1d10 ENC), as well as 1d10 pieces of very nice amethyst.
The bones of the elementalist have an aged and fragile satchel, which contains a climbing hammer, a number of pitons and some very supple rope. A Spot check also reveals the binding item for the Air Elemental, which has cracked. It can be used once more to contain a air elemental of up to Rank 3, then it is useless.
The Passage to the west widens, descending in a slick limestone slop to a pair of smallish cave linked by a short passage. The lower portion of this is filled with giant centipede castings and little else. But the area is unstable and in danger of collapsing into the Great Maw 50 feet below. Anyone moving into this area should make a Luck Check (POWx3%). If they are successful, the feel a tremor, but the floor beneath them holds. If they make POWx5%, the floor trembles and they have time to move away before it drops to the Maw. If they fail, they fall with the floor and may attempt a DEXx3% to grab hold of a nearby outcropping. Failing this means falling to the Maw and landing on a large rock that was once the floor of the cave above. Once each round, the Great Maw attempts to swallow the rock (and any passengers), having a 10% cumulative chance (1st Round 10%, 2nd Round 20%, etc), until it succeeds. Any passengers are also swallowed unless they can get off the rock before the Maw’s Initiative of 10. Athletics checks and similar can be used for climbing or scrambling to an outcropping, etc. But another Athletics success will be required to climb back up to the rest of 4. Any who are not in peril can aid those who are. A successful skill check (the skill may vary according to the player’s description of their help), can grant +20% to the imperiled character’s success chance.
Those who are swallowed are irrevocably slain, their souls consumed, their bodies gone along with all their gear, and are beyond resurrection.
5 – The Lower Warrens (5 to 8): These are the hunting area of the centipedes, who mostly content themselves with smaller prey like bats (hundreds of which roots in the rocky ceiling of the northern room) and other vermin. They are large enough to take cultists however, and are eager to eat anything they can catch. Because the Cultists sometimes hunt them, these centipedes have learned to carry their prey to 6 before settling down to eat.
In the bat-infested heights of the main chamber (the room marked #5) there is a narrow winding access to the surface two hundred feet above, covered in guano because the bats come and go this way constantly.
The long winding passage marked 11 runs through the earth above the passage form 5 to 2, but a cave mouth opens from the upper wall of the room north of 5, overlooking the passage to 5 below. The High Eviscerator keeps a rope coiled at the edge of the ledge and anchored to an outcropping of rock (STR 19).
To the east, a slipway of limestone, slick with water, that descends deeper into the cavern. At the X, there is a hole, with an anchored coil of rope, in the passage which drops 20 feet to 7. The Cultists know this is here and sometimes use it to observe, and possibly attack in case of invaders.
The empty room west of 5 emits a stomach churning stench that hits before the cave itself is entered. This is the actual lair of the centipedes, where they retire when not hunting, which is much of the time. It is littered with old shards of egg cases, cast off centipede shells and thousands of bat bones.
To the south a winding passage, nearly blocked by a recent cave in, leads to 6. It can readily be scuttled over by centipedes as part of a normal Move Action, but requires a full turn to crawl over by bipeds. Attackers have Advantage against crawlers who are slowed.
6 – Centipede Home: This smallish cavern is home to a hive of large centipedes, left to go feral as the trolls who once inhabited these caves died off. They are sometimes harvested by the cannibals when better food is unavailable. Themselves scavengers, they eat any cannibals who die or are too slow. The centipedes have no use for loot, but there is a scatter of coin (31s, 59c), an old belt knife, a newer flensing knife, and a heavy maul head made of brass, left over from the troll habitation, amongst the bones and offal.
7 – Old Troll Home: This section of the cavern once housed Gosdath’s family, including the matron who led them out of Altanen and slavery. Much of its walls and natural terrain features are made from, or adorned with quartz crystal, which the trolls found pleasing to their darksense. A Spot reveals 1d6 pieces of amethyst, and a small vein of gold (1d100 gp and 2d20 minutes to free – 1d4 Enc). A quite large troll skull, with very tiny eye holes, sits prominently displayed on a rock shelf in the north wall. Its tusks are huge, and in fact, capped in silver.
The pool here is extremely salty (which posed no problem for the stomachs of the trolls) and now the source of the brine used by the cult. Though outside of the Heart of Crawral, it is considered to be sacred to the Flesh Eater, and in truth is not without some Blood God Taint.
8 – Old Troll Garden: A shaft of light from far above illuminates a circle of verdant growth on the ground of the cavern. Close examination can see the shoots and stalks growing and bending to capture the wan light from so far above, even as the circle begins to shrink with the passing of the sun overhead. In shadowy areas, large mushrooms grow in a pile of decaying matter. Many of the plants and fungi here are used in the psychedelic potions of the High Eviscerator. She must be careful when she comes to harvest, and generally brings a sleeping draft for the Centipede Matron, who has grown huge, magical and savagely cunning on a diet that includes strange mushrooms. The draft does not put her to sleep, but does calm her enough at the High Eviscerator can harvest the precious fungi.
A vertical passage, resulting from a previous earthquake, opened a way between the troll caves and the Serpentfolk Portal some 40 feet above in 9. This eventually spelled the doom of the trolls. The serpentfolk, after enslaving the trolls, set crude metal rungs in the passage to ease exploration,. If there are serpentfolk in 9, this ladder may be charged with lightning 3 to affect unwanted climbers.
The Fungi: Collecting Fungi is easy if the Matron is no longer a concern. It takes 1 hour to gather 3d4 bunches of shrooms. Roll Alchemy, Herbalism, Survival (at -20%) or randomly for which ones, or let the collectors choose based on your description. Any are of some value to an alchemist or herbalist.
- Sleeping Shrooms: Eaten fresh, they cause bloating and decrease DEX by 1d6 for 1d8 hours. If boiled along with beer, they are a pleasant soporific (POT 13: Failure: Sleep for 1d4 hours).
- Caustic Mold: This mold grows in slimy corners. It is caustic, doing 1 point of damage to living and non-living things on exposure.
- Undeathcaps: These blackheaded mushrooms are deadly poison (POT 14: failure, reduced to 0 HP). When slow-roasted, ground into a paste and boiled in heavy wine, their deadly effect is transmuted and a successful alchemy check can render them into a Healing Potion. By smoking the tendons of a dead man for hours in their smoke, then grinding and dissolving the flesh in a mixture of Wine and Caustic Mold, they can be made into the Drink of Dead Flesh.
- Stupendous Stalks: These stalks, if boiled in alcohol, can create a potion that inflicts Befuddle on a target of the imbiber on a POWer contest success, Duration 1d4 hours. If eaten raw, they cause Befuddle on the eater.
9 – Guest Rooms: This pair of caves are reserved for the visiting serpentfolk sorcerer Itilith, her apprentice, and their bearers. She is unusually nervous, because she is not travelling with her usual entourage of slinkers and brutes. An overlooking ledge glows blue with the power of a transport sigil allowing Teleport to any linked portal. Because of the unstable local geology, Portals come in and out of phase. Currently the phased portal is to the Serpentfolk redoubt beneath Altan Keep.
In the adjoining cave, there are sleeping pallets for visiting serpent folk, and storage cages for their chattels. The Serpentfolk and the Cultists have business dealings, and an uneasy alliance, but neither trusts the other, and both are always on watch against attack.
10 – Guest Ready Room: There are a number of empty cases and cages of serpentfolk manufacture, sometimes used as cover by serpentfolk guards. The bridge may be hauled across from either side, making for a difficult jump, or an unpleasant swim in the river some 30 feet below. Currently it is in place, but will be withdrawn if the cultists or serpentfolk fear attack over it.
11 – Bowels of the Maw: The long winding passage marked 11 opens into the upper wall of the room north of 5, overlooking the passage to 5 below. The High Eviscerator keeps a rope coiled at the edge of the ledge and anchored to an outcropping of rock (STR 19). The tunnel itself descends 50 feet in the span of 150, and leads under the river, which may be heard rumbling overhead. The walls beneath the water are slick and mold grows all over. At the end of the long straightway is a near vertical passage set with crude rungs of wood built into the wall. These lead up in two stages (a climb of some 90 feet overall) and thence to the hidden “back” doorway to the Cult Caverns.
At the northern end of the side passage to the Maw Chasm separating 11 and 2, there is a crude but sturdy ladder that can be laid over the Chasm. The High Eviscerator has two of the Mad Flesh manipulate the heavy ladder (Str 20) to extend it, failure and the ladder is lost down the Chasm.
The Cult Caverns
12 – Above of the High Eviscerator: Reachable by 11, but this is quite difficult. Chamber of the High Eviscerator, lieutenant of the Carrion King. The High Evicerator does most of the actual knife work involved in the cult’s butchery. She is by far the most depraved and cruel member of this terrible group, but has been corrupted less physically than many of the other ghouls. Other than her pale skin and too reflective eyes, she is an attractive woman of Altanen stock. She is completely mad, and does not even remember her old name. She sometimes will leave the Cult Caverns via 11, sometimes to feed and further corrupt the centipedes, but also on missions to resupply the larders of the cult. She will always take Mad Flesh with her, because she has no power over the centipedes. This causes conflict with the Carrion King, who does not want the Mad Flesh moving through his Chamber.
The High Eviscerator’s chambers are hung with curtains of decaying skin and organs. She herself sleeps on a flensing table, but one that has no manacles. A crude wooden table has two censers that often burn aromatic, psychedelic herbs. Next to it is a simple but effective set of alchemy tools for creating tinctures and potions. Both the High Eviscerator and the Carrion King know of the secret door at the back of 12, which, though hidden, has no lock.
Loot: 2 Smudge bundles of psychedelic herbs (Grant +20% to Magic Skill Checks for Rituals or “Research” but addictive on a Fumble of the research or ritual roll; High quality steel flensing set, Mail hauberk Size 12. 2 silver rings, 1 gold necklace, 1 amethyst and amber necklace, all bloodstained. Three potions: 1 Sleeping draft, 1 draft of Furiosa (grants terrible visions and the Berserk rune spell effect for 3d6 minutes), 1 draft of Rejuvenation (restores 1d6 Years of youth, life and vigor), all made in the worst possible way.
13 – Chamber of the Carrion King: The Carrion King lives an ascetic lifestyle, almost that of a horrible monk. He truly believes that Craral is the lord of all flesh, and that all flesh returns to him via the terrible communion of the cult. Alone of his cult, he has nothing to fear from the Mad Flesh, who will defend him to the death against any and all. But he does not recognize the threat posed by the madness of the High Eviscerator. The Carrion King keeps little of worth, but the lefthand cage from his sleep pallet always contains his favorite Mad Flesh: Hound. And the right cage usually has a victim awaiting the knives. At present, this victim is Evain, a Wodelander woman in her late teens, taken up in one of the High Eviscerator’s supply raids. Evain is missing her left arm at the elbow and has managed to avoid sacrifice for over a week, and the Carrion King has some hopes of welcoming her to the cult. She has not caved under his manipulation, but she is becoming unhinged. If she is freed or rescued and sees any further horrors during her escape from the Caverns, she goes mad and is claimed by Craral. If she lives, she may return to reestablish the worship of the Great May, should the Cult require it.
14 – The Mouth of the Great Maw – Here the Carrion King communes with the terrible Maw and sometimes receives messages from the Blood God. There is a throne built of skulls and stones on a dais for the Carrion King, next to it a table and a personal altar/ upright “meat” rack, with some chosen butchering instruments hanging nearby. Captives are never kept here, but a cage in 13 often hold those who will grace the rack.
15 – The Landing – This beach leads to a rockfall and then winds its way to the Commons. Before the final turn to 15, the buzzing of thousands of flies can be heard on the wafting reek from the depths of the cavern. This area is left largely to the Mad Flesh, allowing them to commune with the Great Maw – an opening to which may be found in the Northeast corner. Sometimes Mad Flesh hurl themselves into the Maw. And rarely, the Maw hisses or growls. There are 2d6 Mad Flesh here. There is a crude ladder from the Carrion King’s chamber But the door is always locked and blocked. The Carrion King is safe from the mad Flesh and often walks among them, accepting their adoration on behalf of Craral.
16 – Guardian Carrion Cultists – 3 Carrion Ghouls keep watch here, directing Mad Flesh back where they belong. There is another beach here, of fist to head sized rocks with the river rushing past. Anything that falls into the water here has a chance to get out at the north beach between 3 and 15.
17 – The Meat Rack – When Serpent folk and others come to trade flesh, they are brought here and no further. Currently there are two dead humans, traded to the Cult by a Serpentfolk sorcerer who had no use for them. They were kept from returning to the earth on two heavy wooden tables with manacles, and appear to have been tortured to death.
18 – The Pit – leading to the Great Maw, this one looks much like a terrestrial water well, but for the wafting reek of corruption from below. The rest of this area is picked clean of offal.
19 – The Gullet – This long cavern has two natural elevated platforms of limestone (the Galleries) to either side. When the High Eviscerator is slaughtering or butchering sacred meat, the Mad Flesh are allowed to observe from the galleries, and be fed by the Carrion King. Otherwise this area is kept clear of Mad Flesh and Ghouls alike.
20 – Cult Guard Cave – In the shadows lurk four guards of the Cult, which does not trust the serpentfolk. The stay out of sight of 10 because they know how easily they can be picked off by serpent sorcery. If serpentfolk or others cross the bridge without rapping a code on one of the cages, the guards will hurls heavy stones (60% to hit, 1d10 dmg, and either flee to 18 or 21, or attack if they are not outnumbered.
If they can get to the Bridge, they can loose the ends of the bridge and let it fall, to be reset later when the ropes are redrawn.
21 – Serpent Passage – Once, this way allowed Serpentfolk relatively easy access to the most sacred rites of the cult of Craral. Then a rockfall closed the corridor to 22, and the Carrion King took this as a sign to be more discerning in who to invite to services.
22 – Unholy of Unholies – Beyond the temple of the Flesh Eater, Craral. A butchering Altar, with runnels for blood and collecting pools dominates the far end. Along each wall there are tall amphorae stuffed with brined or rotting human meat. Beyond the Altar, there is a recess in the wall where offerings of meat and valuables are given to Craral.
Iaron the Warlock, is heavily chained here to the butchering altar, and has been for some years. Only recently have the cultists been able to harvest portions of his soul and magic. In the meantime, they have contented themselves with portions of his body. Steaks have been repeatedly cut from his thighs, chest, arms and back, all of which slowly regenerated, until the High Eviscerator gained access to his magic. He is missing a forearm, with a formerly magical ring that Iaron exhausted trying to escape, that is currently in the possession of Gosdath the troll in 3.
In a last, desperate bid for freedom, even as his arm was being removed, Iaron called upon the ring, sending a summons (which might well have been received by the PCs) to rescue him.
Treasure: This room contains the valuables assembled from decades of raiding and slavetaking. All of which have been unceremoniously dumped in an unwanted midden with the picked clean bones of men and trolls.
- Serpentfolk map of a portion of the Portal Network – very tough to decipher without knowledge of the Serpentfolk written language.
- Shadow Spheres: Two black onyx spheres about 3 inches in diameter. They can be placed up to 10 yards apart and instantly create a darkwall three yards high between them. This will last for 8 hours, but the spheres must then be recharged by being set out under the moonless stars for a total of 8 hours, which need not be in one incident.
- Dozens of rusting weapons in a pile. Within the pile (SPOT check): A bastard axe with a Bladesharp 2 rune, and a saex with a matrix for Vigor 1.
- Three moldering pouches containing a total of 74c, 42s, 56g.
- The skull of a vampire, its fangs fully extended.
- A small but surprisingly heavy book, in Altanen, with a thick hide traveling bag: The Little History of the Elder Age of Allori. This anonymous work is said to be a condensation of Allori Zokros’, best known of the sage’s of the Elder Age, nine volume work that has long been lost. The introduction of this little book claims that the unknown author, reading in fits and starts from his master’s full collection of Allori, lived during the Black Reign of Anaximander II, some eight centuries ago.
- Ioran’s Harness: Heavy Mail and composite padded Skirt, Lamellar coat with composite Padding. Full helm. Longsword, dagger.