Adventures in 3D printing - Poe Dameron's Blaster
At the end of January I was finally able to pick up a 3D printer, something I have wanted to do for several years now.
I purchased a Dremel 3D20 Idea Builder. It is a mid-range printer, costing me about $1500 after tax and shipping. I did not want to go for a cheap printer, and even though I could have purchased a more expensive model, I have learned long ago to try mid-range with pretty much everything I do.
A request to document the items I have created over the past near three months was recently made, and I have decided since I am no longer producing even a blog, I would at least do this much.
So my first article will follow the steps I have taken when it comes to making props for my cosplay – and just because I can.
I won’t promise anything, but I might end up writing up one of these articles for each of the props, once each one is complete!
I wouldn’t call these a guide, but they could be used as such, at least a way to show other beginners what and what not to do.
So the first prop I recently completed was Poe Dameron’s Blaster from The Force Awakens. It was also one of the first STL files (the 3D file extension, used in both 3D graphics and printing, from what I understand) I downloaded.
The process to print this out was pretty simple. I will describe in detail how I accomplished each step in the process to go from simple filament to the competed prop – including the mistakes I made along the way and what can be done to ensure others do not make the same errors.
First, I got the files from a wonderful site called Thingiverse. This particular prop came in four separate files – the body, nozzle, handle and rear.
This being my first print, I did not know until later I could move the file on the printer software provided with my new toy. This would have saved me two failed prints.
I had no problem printing the handle and the rear piece. I used the recommended settings and they turned out fine (displayed below)

The first issue I ran into was how crappy the body turned out. I did not know at the time about supports (and believe it or not I STILL don’t know, and it is something I plan on addressing very soon). This caused the overhang to be very rough and the filament came loose.
The second issue I encountered was with the nozzle. The file had it on one edge, and this caused the print to fail.
I’ll address how I fixed this issue.
All I did was take the item while using the provided software and rotated it so one end was sitting flat on the printer bed. I am going to assume all printer software out there has the ability to rotate the item using the three axis points.
After doing this I used another function, which allowed me to ensure the item was flat on the printer surface.
Doing this I was able to get a perfect print!
The other pieces, well the handle turned out fine, but the rear part, looking back, I should have adjusted the piece so the rear knob was located on the top, then I wouldn’t have had the issues of it not printing perfectly.
So with the issues of the body needing supports and not knowing how to deal with that, I ended up using my hand Dremel to excise the filament and do what I could to smooth out the rough areas (see image below)

So, the next step was to glue the pieces together. A person I know – who has been printing for years, and I did not know it, recommended a specific type of glue. I use a brand called Mercury Adhesives, specifically the medium strength. The small 2 oz. bottle was pretty expensive, and cost me $12.
I would guess you could use crazy glue or another brand, but everyone I have spoken to strongly recommend to stay away from Gorilla Glue. The issue with that powerful adhesive is it tends to foam and create a real mess along the edges.
Another friend recommended using resin, but the man who told me about the Mercury Glue said it is all but impossible to sand.
At any rate, I was able to get all the pieces glued together, and used clamps to hold them in place. Of course I left the clamps on for a full 24 hours to ensure it held together, although I have since discovered only an hour or so is required (see image below).

This lead to a new issue.
The problem with the amateurish print was the gaps in the assembled prop (images provided below).


Once again I asked around and was told to use model filler. I picked up a tube for about $7 and used it to fill the gaps (as shown below)


After I allowed it to dry for another 24 hours (going to bed, then to work certainly helped!) I used a medium grit (120) sandpaper to smooth away the rough edges of the filled areas.
With the prop together and sanded my next step was to prime it for painting. This was one of the easiest steps for me to complete… I just got a can of primer and sprayed it down. I let it dry once again for 24 hours and then touched it up (below).

After another 24 hours of waiting, I sprayed on the first coating of the base color. Sadly I neglected to take an image of this particular step, but you can see what the base color looked like in images provided below.
Two issues occurred at once. First, always clean the damn prop before you paint it! Dust and other grit ended up covering the prop, and this caused lumps and bubbles to form. You can see the issues I had with this on the image below.

The second issue was I did not shake the spray paint can enough, so it was blotchy.
I sanded the prop, got rid of the bubbles and grit.
Lesson learned, I finished the base coat and a few hours later, added a little bit of a touch-up.

Now I wanted to have several different colors on the prop, so I used painters tape to cover the base and then used a gun-metal gray to highlight the handle and certain sections of the prop (see below).
Overall I was fairly happy with the prop, but found some of the paint leaked beneath the painters tape and when I pulled it off, it took a few small patches of paint with it.
That required using a brush to cover the patches and ‘erase’ the leakage.
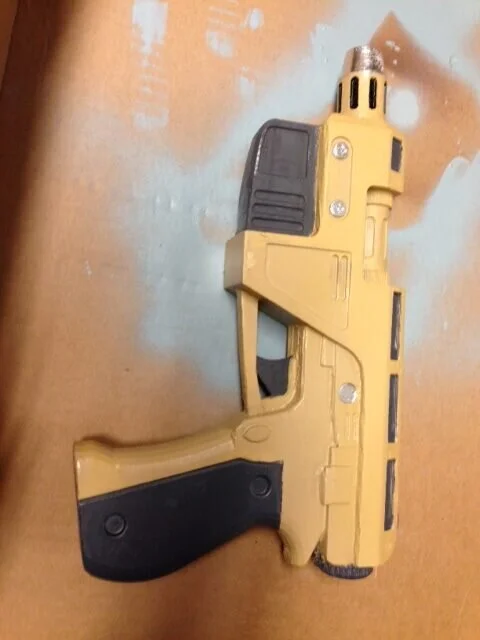
I also added a little bit of detailing - specifically a little silver for the screws and a few minor touches.
And as you can see, this is the final image.


I certainly could have done a lot better with my first prop, but I know it could have been a LOT worse!
As long as I can keep motivated, I will post images and full creation articles for the following props: The Motion Tracker from Aliens, Ahsoka Tano’s Light Sabers from Star Wars Rebels, Chirrut Imwe’s staff and props from Rogue One, a generic Rebel Pilot Helmet, and Poe Dameron’s Resistance Helmet.
You can also expect to see more images, including failures and the like with props I create after the ones I mentioned above… I did not bother with some of them, but I will be sure to take pictures in the future.
Thanks for taking the time to read this article!