

Mask Making Tutorial

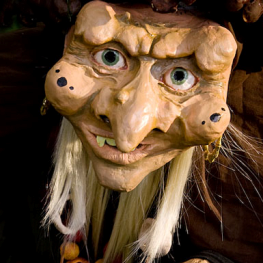
The following mask-making tutorial was written by Emily Marie Harris of AviannaCosplay.com. It uses the "Mommy Fortuna" character from The Last Unicorn as an example and other techniques for painting and eye making will be covered in future articles.
Materials Needed
* Paperclay (available online and from hobby stores)
* Newspaper (I stole a bunch of nickle ad papers from Wal-Mart)
* Bowl
* Flour
* Something to mix the flour and water to make the paste
* A model base (I used a plastic mask I had, but you can have a friend help you and use your own face)
* Clear sealant spray in glossy, matte, or satin
* Model magic
* Sandpaper in a very fine grain
* Face mask
* Any little flares or touches you would like to add
* Paint brush for detail work
Step One: Paper Mache Base
First I used a plastic plain mask to make a base for my mask to start on. If you have a friend they can help make the base via using your own face so that it fits perfectly to you. You start via wetting strips of news paper down with a mix of flour and water. I’ve heard you can use some sugar as well, but I didn’t want to do this cause I didn’t want it to get to sticky. You want to cover the entire face leaving obvious room for your eyes, mouth and nose. A few layers of strips going horizontal, then vertical then horizontal again should make a strong base. Let this dry.
Step Two: Adding Features

Once the base is dry, you’ll want to start shaping the face to suit the character. For Mommy Fortuna, I needed to add more to the eyebrows, widen the face a bit, add cheeks and a strong base for the nose. I also added a bit to the chin. To do this, I layered tons of newspaper to these areas. Sometimes I would use some super absorbent paper towels that were soaked in the paste and rung out to help speed the layering. You have to added newspaper over them however to keep them in place and you need to add quite a few layers to keep it secure.

Also, for Mommy Fortuna I put straws in the nose leading down to where my mouth would be for air because I knew the nose would be to big to breath through. You may want to play with this just in case your character’s facial structure is a bit off of your own.

With the areas I couldn’t completely make perfect in shape I added model magic after the paper mache had dried. I put balls on the cheeks, added more to the eyebrows and made most of the ball of the nose. You then wait for all this to dry.
After all this is dry you may want to add in your eyes. For Mommy Fortuna, I made my eyes out of one Styrofoam ball with model magic over the rounded surface. I then used a straw to put holes through the ball where the iris was so I could see. Later, when I painted it the black make the hole almost invisible. Remember thou, you don’t have to make eyes, you can always used your own :)
Step Three: Surface and Detailing

Once all this is dry you can take out your Paperclay. Dip it in some water and smooth it out over your surface. If you keep it all a little wet you can cover your entire surface with it and still have it ‘sticky’ enough to add more paper clay where it is needed for details.
With Mommy Fortuna I added the entire surface and went back through with the opposite end of a small paint brush to get all the wrinkles and the nose holes in the nose. I also found that is you stretch a bit of thin plastic, like a plastic bag, really tight over a surface and press down it can make some pretty realistic wrinkles.

With Mommy Fortuna, I stopped here because I felt a semi lumpy surface would add to an aging character’s face. However, when working on my Neofio costume I moved on to the next step to make the surface smooth.
Step Four: Sanding
For this I recommend you put on a face mask because sanding the dried paperclay can make quite a bit of dust. I would also recommend doing this outside if possible. Using the sand paper you can smooth out the surface of the mask. As JiaJem states in her armor tutorial you can also use a sander if you feel it would be faster, however, I found that for a mask, in order to make all the details, cracks and bumps, you may need to do this with your hands. Smooth out the surfaces as best you can. The beauty of paper clay is if there is a crack or a lump you wish to fix, just wet the surface around the crack a bit and add more paper clay to dry. When its dry just sand it again and it shouldn’t be there. You can do this as many times as you like, which isn’t always the case with fiberglassing.
Step Five: Painting and Finish

Now would be the time to paint the mask (A Future Tutorial will explain some awesome painting techniques), perhaps add eyelashes to your eyes, hair, earrings, ect ect. Make sure to finish off the mask with a clear coat of paint to seal it all in, and voila! Mask!
Step Six: Attaching it to Your Head (Optional)
I’ve found that the best way to attach anything to your face without completely making the tops of your ears blister is with a tight fitting stocking cap. You can buy these in the winter pretty much anywhere in any style. Non-Knitted ones have a stronger backing for denser masks. For Mommy Fortuna I bought a fleece, but lined stocking cap from Wal-Mart for $5. Using upholstery thread and some interfacing I would pull the needle through the cap, mask, then interfacing to give it a strong backing. I used thicker interfacing. Infact, I used scraps.I did this in a line on the rim of the cap. This made the mask easy to lift to talk and also easy to adjust.

