Ragnarok Tabletop Ice and Snow Terrain!


At the Skirmisher Leadership Retreat a couple of weeks ago, it was blazing hot in the Texas Hill Country! But upstairs in Skirmisher HQ, it was cold as Ice - at least when we were playtesting Ragnarok: The RPG of the Death of the Nine Worlds.
Since we were going to be streaming the playtest episode AND since we had a great model to use in Michael O. Varhola's classic Border Keep (built by him, his brother and father when Mike was a kid), we decided to incorporate miniatures into the session.


(Here is a shot from overhead and another of the approach to the Border Keep as built by the Varholas)
Ragnarok is designed with the possibility of using miniatures, and will seemlessly sync with the Ragnarok Miniatures combat game in due time, but it can jut as easily play miniatures-free, and often this is preferable. This time, we elected to go with minis, and I am glad we did, cuz it was extra fun.
There was one little problem though.
The Border Keep was built with a nice green grass area surrounding it, and Rafnarok begins in the throws of the Fimblvintr, the Winter that just keeps on keeping on.

(Here is a screen cap of the Border Keep in use in Old Giant's Work, the Ragnarok scenario I ran at the Skirmisher Retreat), you can watch the whole session here: Part One, Part Two.
What's A Sagamaster to do? Well - if he has time and inclination, he makes some Ice-themed scatter terrain to throw around the board. Here is how:
What you will need:
- an OLFA or other adjustable blade utility knife with a long blade
- some scraps of foam board insulation, ideally 2 inch thickness, but you can cut, glue and stack thinner stuff
- plasticard or 1/8th inch MDF board, or similar for bases
- Sand and gravel in various coarseness to scatter on base
- powdered terrain "snow" (available at most gaming shots that cater to wargamers at all)
- Glue gun, White "school" Glue, Crazy glue (thick)
- White Spray Primer
- Miniatures Paint: Blue, White, Blue Ink, brushes for same
- Water
- Spray sealant (matt, if possible)
Optional: Masking tape or blue tack, popsicle stick.
Depending on what you have available and what you are willing to buy, you may need to go out and purchase some stuff. Since I do this with a certain regularity, I had it all lying around the house. You can use scraps of foam board, I had some cut ends from another project that I used up, which was perfect.
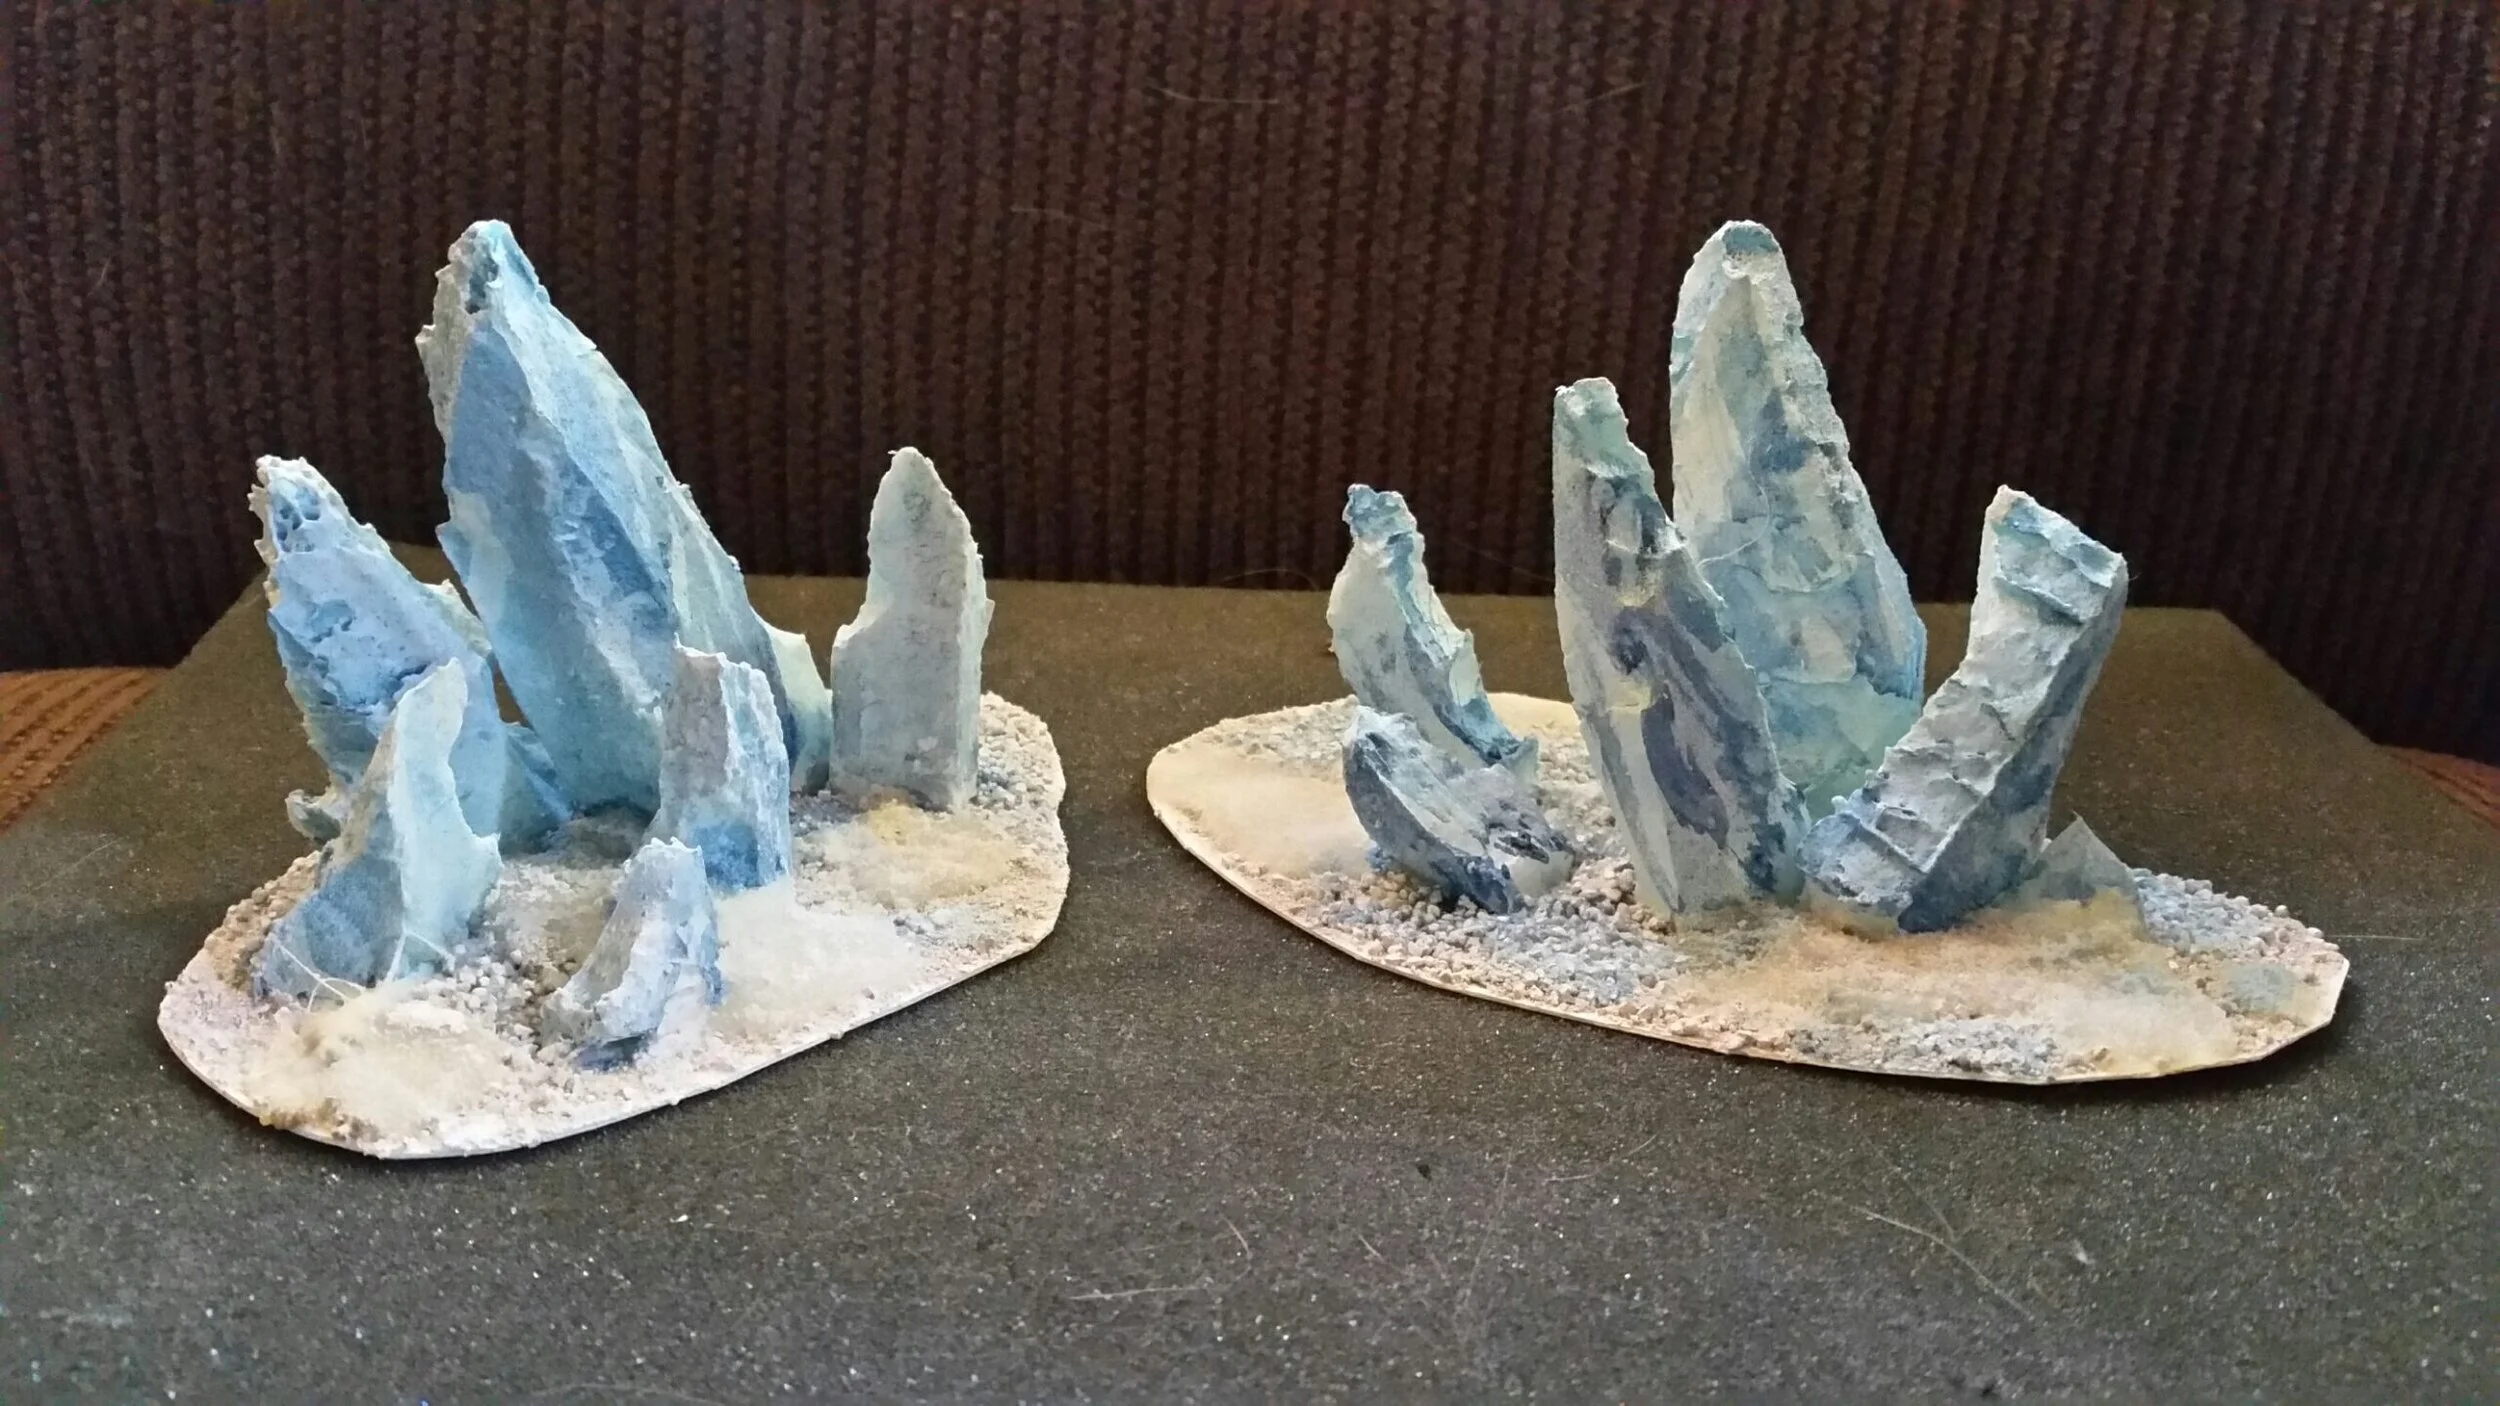
Step one: Cut shapes out of your basing material big enough to leave at least half an inch around the edges of any ice shards or other features (I left more like an inch and change). If you used plasticard like it did, you can use strong scissors for this. With MDF, you will need a scroll saw, which is a pain.
Step two: Using your utility knife shape some of the foam board scraps into irregular crystalline "shards". Start with pieces of foam that are about 50% larger than what you want to finish with, because you are going to remove a fair amount in the process. This is kind of an "artsy" part of the build that is hard to teach. but try not to be regular in your cuts or shapes. You want things to look crystal like, but also broken and wind-honed and jagged in ways that break up the regularity of a true crystal. Ice has faults in it and it fractures along those faults. You want to have irregularities cut into the shapes because that is what will really sell the look when you paint them up. If things look too regular, hopefully step three will help you out.
Step three: Once you have things looking pretty good, you can do this or not. It can help make the ice shards look less regular, but can also be intimidating if you are used to it because it feels like you are ruining what you did in step two. Her goes: With your fingers, pinch pieces of the sharp and carefully tear them away to create scallops or long tears in what might have been regular flat panes of "ice" surface. I can't tell you how often to do this. But I can suggest that you look at some images of icebergs and such for reference. Art reference is ALWAYS a good idea, especially if you are not sure of your skills. When you are done with this step, your shards should look less regular overall, and have some spots that look like a shard has recently "calved" from it. Shards that are thinner toward what will be the top look better. And keep in mind that the bottom will get slices flat to glue on to the base. finally, you are going to want shards ofdiffernt sizes, so bear that in mind while you are carving.
Repeat the process for as many shards as you want. This will depend on how many you are doing and what size they are. Mine were about 5 to 6 inches across the base with highest shards being about 4 inches long.
Step four: Working one base at a time, test fit your shards to the base with masking tape or blue tack, looking for a good spread that appears chaotic and natural. I did mine from the center out, but tried to vary the placement to break up the sense of order. You want these to look like they have bee there a while, and have been calving, shifting, moving and leaning the whole time. When you are happy with one, go ahead and slice off the part of the shard where you are going to attach it to the base. This doesn't have ot be a perfect cut, but should allow enough contact that you get a good glue bond. Glue your pieces in place with your chosen glue method. I was in a hurry so I used thick gel crazy glue, but you can use a glue gun if you have more time to clean things up and are generally more patient than I see to be. Repeat for aas many shards as you want to build.
Step five: Once your glue is dry (a minute or two). you can do some base detailing. I kept mine minimal and did not sculpt snowdrifts or anything like that (but wait for my follow up article on that). So all I did was take white school glue (watered down to about 50%) and a crappy paint brush, and paint the whole base, and a bit on the very bottoms of the shards. Then take your base sand and gravel and cover the base in scattered patterns, generally keeping the bigger bits toward the center. Wait for your glue to dry (this will take hours). At that point, you can add another coat of the glue (carefully) if you want, and add some more ground scatter. But be careful, because the wet glue will turn the dry glue wet again, so everything that was stuck to the surface before you wet it will now come off). Really only redo this step if there are issues with coverage.
EVEN THEN, consider this instead:
After you finish Step six (below), pour globs of gel crazy glue onto any spots on the base that you don't like and scatter terrain snow on it. then us a popsicle stick to smush it into a patch of snow. You can cover all the issues you notices above this way.
Step Six: Prime the entire model with white primer. It doesn't need to be miniatures primer. Hardware store primer is fine. Let dry. The primer, along with the white glue, should keep everything together pretty well.
Do what I said in EVEN THEN, above, to fix any base issues.
Step seven - Painting: make up a fair amount of 50/50 or even weaker water /blue ink Weaker means you can do it more than once to get gradations or sufficient color). Using a largish brush, brush the ink into the recesses and cracks that you have carved in, and pulled away, from the shards, pay particular attention to the base of each shard, where you want things to look a little darker. The base you can dab in places, but mostly leave it alone. Let dry. At this stege the model will look like garbage. Persevere.
Step eight: Using a large drybrushing brush ( a cheap flat brush about 1 inch across that you often see in craft store brush assortments works fine for this) drybrush white over the shards. If you don't know what drybrushing is, there are a lot of tutorials available, and this is the perfect project ot practice, because it is so forgiving. The key is to get nearly all the pigment off you brush by rubbing it on a paper towel or similar, then work you way across the shard's long axis, leaving white on the edges, breaking up the blotchy blue from the previous step and adding depth to the paint that makes the shard look translucent - like ice is supposed to look.
Drybursh the tops of any ground material that you dabbed with blue to blend them in.
Step nine: Add more terrain snow by sprinkling pinches of it from between your fingers, to build up patches of snow scatter. You can also play around with holding the model sideways and doing the same to build up a snowdrift at the base of a shard ot two, or even snow caught on a pane of a shard, etc. Wind and weather do this, so you can too. But Mother Nature is the best artist and terrain maker there is, so do so sparingly.
Step ten: when it is all dry, seal with matt sealer.
That is it - go play with your ice shard terrain. And come back in a few for my tutorial on how to make ice banks.