
Tips for Making Costume Shoes!


This tutorial isn’t for making any specific kinds of shoes (but I’ll try to post some at the end that I like). It's simply a summation of tips on making shoes. A great pair of shoes can really make a costume for a convention or a Larp!
One of the most important things about making shoes is getting the correct measurements. Although you could put your foot and leg on a piece of fabric and trace it, it’s still going to be hard to get a nice, snug fit. Sometimes that takes quite a bit of altering and time. So let’s make some great shoe patterns.
Making a Pattern
You'll Need:
- Painters or Masquing Tape (A tape that is not so sticky that you won't be able to to take it off your shoe)
- An X-Acto Knife
- Marker of Pen
- Scissors
- Fabric or Materials similar to what you are gonna use (Like Muslin or a paper towel)

1.) You layer on the tape like you would strips of paper on a paper mache project. Try to cover the entire shoe with about one of two layers going every which way. If you just layer tape on tape in the same direction, it will not come up as one piece.

2.) Take your marker or sharpie and trace out where you want the seams in your shoe. So if half is red and half is white, draw your line down the middle
3.) You now have to decide if you want to add or alter seams to your shoe. For example, when I built my BB Hood shoes, I noticed there was only one panel on top. But I decided to make one up so it looked more like BB Hood’s shoe. To make sure the shoe stayed flexible -- like the original shoe -- I followed the original shoes seam.
4.) Use an X-Acto knife to put on the lines so that you can take off the tape, being careful to keep the pieces together.

5.) Take those pieces and stick them to a material similar to what you will use to cover the shoe. I used muslin since I used broad cloth to cover the shoe. You can also use paper towels or felt. I would not recommend paper because it’s hard to manipulate curves similar to a shoe.
How to Put it All Together
From here you should have a pattern. Be sure to add a seam allowance no matter how you put it on. Here’s how I do it!
I use:
- E6000 glue
- Tacky Glue
- Sometimes Foamies
- Sometimes Ribbon
- Sometimes Interfacing
- Adhesive Spray
- Hot Glue
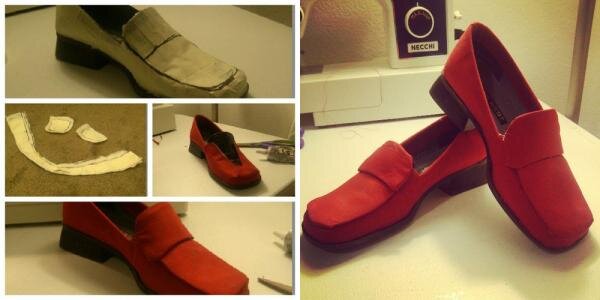
As a concrete example of how I make shoes, here's how I made BB Hood's shoes:

1.) I used my shoe pattern to cut out red broadcloth. After cutting it out, I cut out some interfacing to go under it, because I didn't plan to use foam on the bottom panels. The interfacing helps with flimsy fabrics so they don’t wrinkle as you glue them on.
2.) After cutting out the fabric, I stitched the bottom panels together in back. Because I didn’t want to bother with puckering in the front of the square toe, I didn't sew on the front two panels. However, I’d recommend trying it out with your muslin patterns beforehand, if you want to see if it would work for you! (YAY, mock trials!)
3.) I started with some E6000 glue on the back seam so I could be positive the shoe would be centered there. If there is a place like that on your shoe, I'd recommend starting there, too. It will normally be that seam.
4.) While the E6000 was still tacky, I put more glue on the bottom edge of the shoe, close to where the shoe hits the sole. Then I started going along the edge and slowly pressing the fabric against it. Sometimes I used a tooth pick or safety pin to tuck the edge of the fabric into the crease between the shoe and the sole. (You can also use a cheap ribbon glued onto of this area to make it mask any fringe or glue that may come out. It just looks more polished that way).
5.) After following it all the way around, I added a bit of glue to the arch of the shoe. You can get to it easy from the top.
6.) I then glued down the top edges, folding the top of the seam allowance into the shoes, using E6000 and tacky glue. I use tacky glue at the end to help with fraying  It looked like this at this point:

7.) I cut out foam for the top panel’s two pieces
8.) For the top of the shoe (but not the flap part close to the top) I’d use adhesive spray to put the fabric onto the foam and hot glue to tack the fabric under the foam
9.) For the top flap I made a casing with broadcloth and put the foam inside. I then used tacky glue to tuck the fabric inside, making sure to tuck it into the back so it didn't show in the front.
10.) Use E6000 to press it all down and hold it for a bit. I also used hot glue in some places.
11.) BAM SHOES!

Thrifting for Shoes
Now I know you’re thinking: "but now I can’t use those shoes anymore!" No sweat. Buy online or go thrifting. The two important things you need are the shape of the toe and the style of the heel. Everything else you can alter. If you find boots, but you need to make short shoes, you can cut them down. If you need a boot, but can only find the right heel in a pair of 80’s heels, you can use your pattern to make an altered pattern that would still fit the base of your shoe. Example:

When I made Rose’s boots, I found the perfect toe and heel online. However, one of her boots is a thigh-high and the other is short. I used the pattern-making to cover the boots and then used the pattern to make a cover that went over those boots. Here are other examples of cosplayers doing this.

She made these cowboy boots from ankle boots

She made these shoes via painting a $10 white pair of white Chucks. (Yellow Chucks can go for as much as $80 in this style)